


This free-standing storage rack offers 6 parallel supports that are great for storing things that need good air circulation, like lumber. It stands 180cm tall, and 66cm deep, with 61cm between the centers of the supports.
Made from a hardwood like red oak, this rack is able to hold quite a bit of weight. A softwood will also hold a decent amount of weight, but consider increasing the thickness of the material if you intend to really load it up.
Build two or more of these units and stand them in line to store even longer material or equipment.
Building Instructions
Begin by ripping the stock for the shelves and feet to width. This will make it easier to size the dados in the legs accurately.

Next, rip the stock for the legs to width, then cut them to length with a 5° angle on each end. Make sure the ends end up parallel, and not wedged!
The trickiest part of this build is cutting the dados for the shelves. The dados should fit snuggly to provide the most support for the shelf. But that also means they must be cut at exactly the same location and angle on each leg, or it will be impossible to assemble the unit. Make sure your saw's miter gauge has as little play as possible, and holds its setting firmly. Also use a stop block to make repeat cuts, to avoid error introduced from repeated measuring and marking.
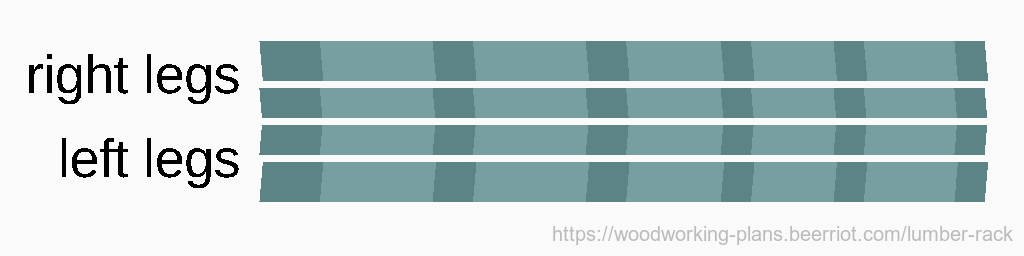
Tip: After trimming the ends, but before cutting the dados, all four legs will be identical. The dados for the right legs go on the opposite side as the dados for the left legs, though. This puts both front legs on the inside of the shelves, and both rear legs on the outside of the shelves. Making sure all of these dados align requires either being able to reset either your miter gauge (to +5° and -5°) or your stop block (to each shelf height, after completing one pair of legs) accurately. If you decide to – or accidentally – put all the dados on the same side of all the legs, you will need to adjust the length of one or more legs of the cross braces, to accomodate one of the rear legs being on the inside of the shelves.
Cut all leg dados to the same depth. The legs will "sandwich" the shelves, and they should all to sit flush for a strong glue joint. A good depth for the dado is 1/3 the thickness of the shelf, or 0.6cm.
Cut all shelf supports and feet to length. Adding a 5° cut on the back is optional, but does make alignment during assembly easier. Adding a 30° relief to the front of the shelves is also optional, but will likely lead to fewer knuckle and material scratches down the road.

Dry-fit the legs to the feet and shelves. The 5° edge of each shelf should be flush with the back edge of the rear leg. If you can, clamp one whole set together at once, to ensure the fit is good. While clamped, pre-drill holes for dowels or screws. Two such fasteners should be used in each place a leg meets a shelf or foot.
Pull everything apart. To assemble permanently, spread glue evenly across the bottom of each dado and clamp back together. Glue and hammer in dowels, or drive screws, immediately to aid alignment. I recommend working from the top down. The top two supports kind of have to go in together, but the lower supports can be twisted into place one at a time.
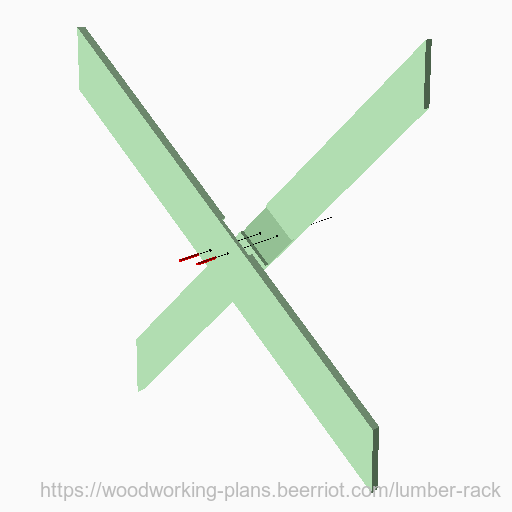
While the shelf assemblies dry, make the cross braces. These are half-lapped X shapes. The ends are cut at 45°. The dados/laps are cut perpendicular to the sides (90°). To make sure they are centered in the brace, use a stop-block. Place one of the brace stiles against the block and cut one side of the dado. Then flip the stile around and cut the other side. Work the stop block out, repeating both cuts, until the other stile fits in the dado. When the fit is perfect, cut both walls of the dado in the other stile.
The cross braces should be similarly assembled using glue in the bottom of each dado, with dowels or screws through the center for alignment.


Attach the cross braces to the shelf assemblies with your choice of fastener. I found it easiest to attach the lower brace first, with the shelf assemblies laying on their backs. With the lower brace in place, the rack can stand on its own. Clamp the upper brace in place, checking that the shelf assemblies are plumb, and then fasten it in place.
Optionally, attach a small cleat that protrudes from the back of the unit. This allows the flat back of the unit to be used to store larger sheet material, like plywood.
Notes
The back of this unit is a great place to store larger sheet goods. Simply attach cleats that protrudes from a low spot on the back. The cleat will keep the sheet goods off the ground, and they should otherwise stably lean into the 5° back.
Alternately, this rack can be made double-sided. Instead of cutting the shelves and feet to sit flush with the back, cut them to extend past the back just like they extend past the front.
Copyright © 2023 Bryan Fink
 This work is licensed under a Creative Commons Attribution 4.0 International License.