How do I use these plans?
The plans are mostly drawings indicating the size and shape of the piece of the project, and showing some of how they fit together. How to interpret each of the drawings is discussed below. Step-by-step instructions for how to shape and assemble each piece are not always included. If there's a step you'd like guidance on, please visit the GitHub repository, and file an issue asking for it.
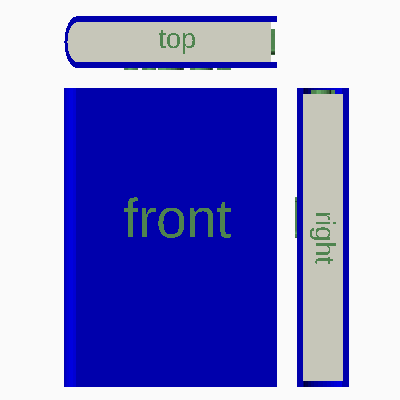
What is this drawing with three items set near each other?
This diagram is called a third-angle projection. It displays an object as if you were looking at it from three perspectives at once. In counter-clockwise order, they are the view from above, the view from the front, and the view from the right side. While the "3D" view seen elsewhere can be useful for getting a "feel" of the object, the third-angle view makes it easier to clearly label dimensions.
The examle here is hopefully recognizable as hard-cover book. From the front, you can see the title on the cover. From the top, you can see pages inside the cover, and the spine on the left side. From the right, you can see the pages between the front and back covers.
Occasionally you'll find a diagram like this has only two views: front and right. That's because the top view doesn't add anything interesting, so it has been omitted to reduce visual noise.
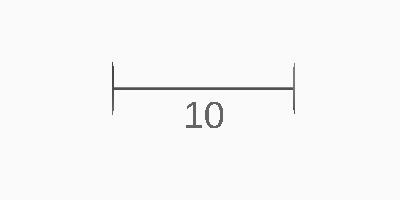
What is this bar with a number near it?
This marker labels a dimension. The distance, in centimeters, between the short lines at the ends of the bar is equal to the number near the bar. The example bar here shows 10cm. (Note: the bar is unlikely to be 10cm long on your display - it is only indicating scale.)
This marker labels an angle. The angle is measured from the straight arm to the end of the arc, with the pivot point being at the end opposite the number (the end on the inside of the arc's curve). The number is gives the size of the angle in degrees.
What is this diagram with names and numbers in parentheses?
This is what I call the "key". Like a key on a map, this diagram displays the name of each component next to an example of the component. The number in parentheses is how many of that component there are in the piece.
The example here says we'll need one BOOK an three PENCILs.
How do I change the dimensions of the project?
Changing the dimensions, or other design aspects, of the project currently requires you to install and get familiar with some software. The files used to generate the diagrams here are open-source. Visit the GitHub repository to download them. Instructions for modifying the models and regenerating the diagrams are included there.
How precise are these measurements?
All measurements are computed from a model. From that perspective, they are exact.
All measurements have been rounded to the nearest tenth of a millimeter, to limit display space. From that perspective, they might be up to 50 micrometers off (just under 0.002 inches).
The real world imparts error into any measurement. Tools cut just a hair wider or narrower than expected. Wood swells and shrinks with the seasons. Small differences are noticable in some places, but not others. My advice is to treat the measurement given here as correct, but do not discount what you observe when measuring in your shop. Sometimes a 1cm tenon fits a 1cm mortise, sometimes it needs a light sand, sometimes the swell from the moisture in the glue solves the wiggle.
Can I share these plans?
Yes! These plans (text and images) are published under the Creative Commons Attribution 4.0 International License. Share them with anyone who is interested. Just be sure to tell people where you got them, so they can come back to find bug fixes, improvements, and new plans.
The code used to produce these plans is also shared under a permissive-with-attribution license.
Copyright © 2021 Bryan Fink
 This work is licensed under a Creative Commons Attribution 4.0 International License.


